
![]() Lesson Plan Created by Corinne Takara & Pantea Karimi
Lesson Plan Created by Corinne Takara & Pantea Karimi
Explore: Building Prototypes of Slot Shelters
Grade Level: 4 and 5
Timeline for completing the project: Sep-Oct.2011
2 workshops, each 1 hour.
Workshops breakdown:
- Workshop 1: Students answer to essential questions, brainstorm ideas, and learn the essential vocabularies. Students make up teams, measure and cut the the cards and slots into the cards. Teachers takes notes!
- Workshop 2: Students draw patterns using provided themes on their slot cards. Each team creates their prototype shelter structure using their 16 finished slot cards. Each team presents and shares their shelter structure/discuss ideas behind their creation. Each team fills in the Student Project Statement form. Teachers record/video tape the process!
BRIEF DESCRIPTION:
This project is a lead in brainstorming and exploring the shelters function, creating slot cards and collaborating in building prototypes of various kind of shelters. Students cut cardboard and collaborate in teams in making these card prototypes and they write how their built-structures addressing a need. This is a hands-on project for later online collaborative sessions in Google Sketchup.
SPECIFIC OBJECTIVES:
- Students brainstorm, collaborate in teams and explore various built structures, in order to create shelters addressing different needs.
- Students compare and contrast different ways shelters are defined and used.
- Students demonstrate an understanding of plane and solid geometric objects and use this knowledge to show relationships and solve problems in creating a structure, using tools and math and visual arts vocabularies (rulers, geometric, measuring, size, balance, angle, parallel, compass, symmetry, perpendicular)
ART AND DESIGN HISTORY CONNECTION:
- Eames House of Cards, 1954, inspired Slot Shelters. Charles Ormond Eames, Jr (1907–1978) and Bernice Alexandra “Ray” Eames née Bernice Kaiser (1912–1988), American designers, made major contributions to modern architecture and furniture. Their work in the fields of industrial and graphic design, fine art and film are also well known. More information about Eames: http://eamesgallery.com/cart/prod_subcat.php?id=4 http://en.wikipedia.org/wiki/Charles_and_Ray_Eames
- Contemporary artist, Damion Ortega’s slotted tortillas: http://www.tate.org.uk/modern/exhibitions/untitled/ortega/
- Contemporary artist, Todd Gilens: http://www.follywog.net/projects/playingcards.html
ESSENTIAL QUESTIONS:
Please take notes of thoughtful answers to the essential questions and while brainstorming ideas of shelters or of any students’ intriguing discussions. Teachers may record these notes on the board and take a photograph after or ask students to write them down on papers or on the board then take a photograph. Share these notes with slot shelter project website via blog posting or email Slot Shelters lead team.
- What is a built structure? Ex. houses, shopping centers, bridges, play structures, recycle-collecting structures, waiting spaces in bus and train stations, street vender’s booths, or camping tents.
- What is the difference between personal space and public space? Ex. houses; rooms in a house (bedrooms, dinning rooms, bathrooms), waiting spaces for public transportation (bus, train, taxi, etc.), car vs. bus.
- What kind of privacy one might need while out in public? Ex. people in a line waiting to enter a theater; is there any personal space while waiting in the line? Calling on a cell phone? or eating while in line, If so, how do you define that personal space?
- What is a shelter?
- Is shelter a kind of built structure? Does size matter for a shelter? What kind of space does shelter require? Big or small? What makes you comfortable in a shelter? What makes you uncomfortable? Why do people need a shelter and when?
- How many kinds of shelters are out there? Ex. Some shelters are created during disastrous times (tsunami, tornadoes, storms, etc). Ex.: how did Japanese personalize space and how did they create shelters during the tsunami ordeal? Evacuees from Futaba, a town near the tsunami-crippled nuclear plant, rested in spaces divided by cardboard at Saitama Super Arena: http://photos.oregonlive.com/oregonian/2011/03/japan_earthquake_67.html
- Others: Have students think of any kind of shelters that is unique to their environment or can potentially be built specifically for their environments.
REQUIRED MATERIALS:
- Flat thin card-boards or tag board cut into 22”x14” or recycled cereal boxes cut into flat sections. Each classroom will divide into teams. Each team will consist of 3 or 4 students and creates 16 cards total. Teachers may provide thin card-board, 22” x14”, or recycled food boxes (such as cereal boxes) depending on their classroom size and the number of teams in their classes. (this dimension of 22” x 14” is an estimate as the cardboard boxes may be of different sizes. The boxes are pre cut at this stage merely for easier handling. The carboard will be cut by students during the activity into the smaller 4” x 2.5” slot cards.)
- Pencils, rulers, scissors, tape, colored pencils, and markers.
LESSON PLAN PROCEDURE:
1. Have students form into teams: 3 to 4 students in each team.
2. Students measure and cut the cardboard or cereal boxes into size: 4 x 2.5in. (10 x 6cm). Each team cuts 16 cards total, 4 x 2.5in. (10x6cm).
3. Creating the Slot Card: A. measure and mark half way (1.25 in) on both of the 2.5’ sides B. line up your ruler along the half way tick marks and draw-in 2 slot-lines, each half-an inch, from each side. C. measure and mark on both sides of the 4” length of the card, away from up and lower edges. D. line up your ruler again along the tick marks and draw-in lines, each half-an inch, 4 slot-lines from the upper and lower edges of the card, below image:
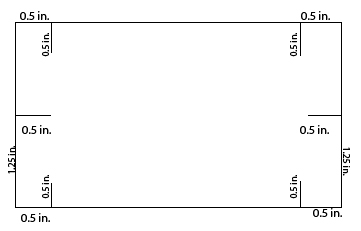
E: using a pair of scissors, cut along each slot-line, creating half-an inch slots F: use this first slot card as a template to cut the rest of your cards: put your template on top and you may use a paper clip to keep the two cards tact in place, or hold the two cards tightly, then use a pair of scissors and cut through your half-an inch slots on all sides. G: remove the paper clip and you have two slot cards. H: repeat the process F to cut all of your cards in order to get the 16 slot cards.
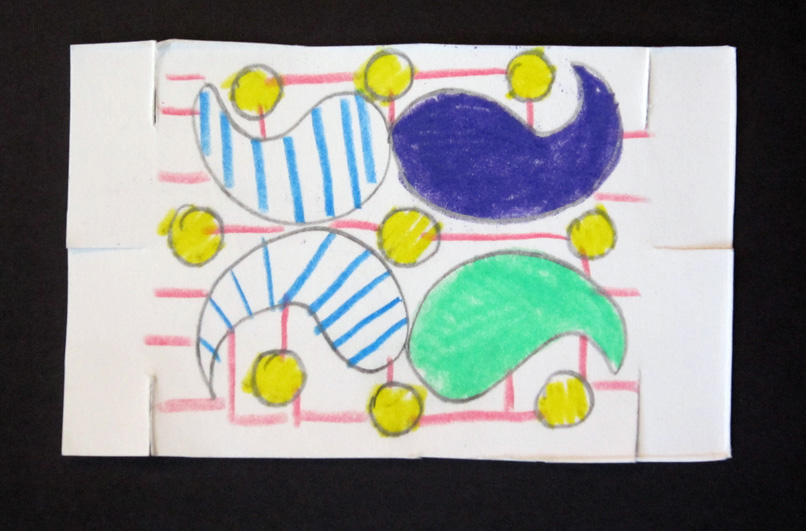
4. To complete your slot cards: students draw patterns on the blank side of each card inspired by themes: 1. Geography (location, maps and places) 2. Culture (food, festivals, celebrations, traditional games, crafts and arts) 3.Architecture (traditional, modern, or cultural buildings and structures suited to students’ specific environments). sample image below:
5. Ask students within each team to think about a shelter, those that were discussed earlier, and explore ways they can create it using their finished slot cards. Then each team uses their 16 slot cards and join them together through the slots and create a built-shelter-structure. Sample image below:

6. Record each team’s shelter structure by taking digital photos and recording videos.
7. Each team reflects in writing on the meaning of their pattern designs and shelter structures on Student Project Statement form.
ADAPTATION AND EXTENSION:
Students could create pattern designs on their cards representing other aspects of their cultures: vegetation, habits and their personal houses, neighborhoods. etc. Students could expand on the idea of shelter based on their environments and or neighborhood configuration. Students could create connector cards of different shapes for the card building. They can explore designing cards that will connect cards at 90 degree angles as well as round cards. Students could explore how cardboard is used in prototyping in real life careers. (environment designer interview to be posted here on this page in October 2011)
CLOSURE:
Each team presents and share their shelter structure.
Students/each team discuss ideas behind their built-structures and pattern designs.
Each team collaboratively records their inspiration source and how it represents their community in the Student Project Statement form.
ASSESSMENT:
Did student create thought provoking shelter structures? Did student use correct geometry and visual arts vocabulary in explaining their team structure in class discussions? Did student create a neat and careful structure? Did student complete their structure design in timely manner? (rubric link to come soon in September 2011)
NOTE TO THE TEACHER:
Teachers must have cameras available to record the shelters building process and the final result of shelter models. If you don’t have a digital camera/video recorder please contact the Slot Shelters team, contact info is provided on the Teachers’ Welcome Package.
Student Project Statement should be printed in advance. 1 form per team.
ESSENTIAL VOCABULARY:
Pattern: the repetition of an element (or elements) in a work of art.
Radial Pattern: Visual elements (shapes, words, images) are distributed around a central point, spaced at an equal distance apart from one another, and often radiate from it like the petals of a flower.
Structure: In engineering and architecture, a structure is a body or assemblage of bodies in space to form a system capable of supporting loads.
Shelter: a basic architectural structure or building that provides cover.
Balance in visual arts: arranging elements so that no one part of a work overpowers, or seems heavier than any other part.
Balance in Architecture/Built-Structure: Balance is visual concept that relates to our experience of physical balance.
- Axial symmetrical balance: arranging visually equal elements on both sides of a single axis, like the human body, or most traditional churches
- Biaxial symmetrical balance: arranging visually equal elements in each of the four quadrants created by a pair of crossed axes, like the Shedd Aquarium building in Chicago, 1930.
Asymmetrical balance: arranging visually unequal elements around a point such that their visual weight of each element multiplied times their distance from the point of balance all equal one another, like the careful placement of stones in a Japanese garden, or red sculpture by Alexander Calder on Dearborn Street in Chicago. This type of balance is the most widely used in architectural composition today, due to the extreme complexity of most building functional programs, which prevent total symmetry.
GRADE FOUR & FIVE STANDARDS ADDRESSED:
Grade 4: Mathematics: Measurement and Geometry/ Operations and Algebraic Thinking
Students demonstrate an understanding of plane and solid geometric objects
and use this knowledge to show relationships and solve problems: Identify lines that are parallel and perpendicular. Identify the radius and diameter of a circle.
Identify congruent figures. Compare geometric figures using size, shape, orientation. Generate and analyze patterns. Visualize, describe, and make models of geometric solids (e.g., prisms, pyramids). Know the definitions of different triangles (e.g., equilateral, isosceles, scalene)
Grade 5: Mathematics/5/Measurement and Geometry
Transformational Geometry: Identify and draw lines of symmetry of basic geometric shapes. Students identify, describe, and classify the properties of, and the
relationships between, plane and solid geometric figures: Measure, identify, and draw angles, perpendicular and parallel lines, rectangles, and triangles by using appropriate tools (e.g., straightedge, ruler, compass, protractor, drawing software).
Identify and use the following plane and solid figures: pentagon, hexagon, octagon, pyramid, rectangular prism, and cone.
Grade 4: Social Studies Standards: Culture and Geography
Students demonstrate an understanding of the physical and human geographic features that define places and regions: use maps, charts, and pictures to describe how communities vary in land use, vegetation, wildlife, climate, population density, architecture, services, and transportation. Students describe the social, political, cultural life (celebration, festivals) and interactions among people.
Grade 5: Social Studies Standards: Culture and Geography
Describe how geography and climate influenced the way various nations lived and
adjusted to the natural environment, including locations of villages, the distinct structures
that they built, and how they obtained food, clothing, tools, and utensils.
Describe their varied customs and folklore traditions.
Analyze Art Elements and Principles of Design for Grade 4 & 5:
Grade 4: Students perceive and respond to works of art, objects in nature, events, and the environment. They also use the vocabulary of the visual arts to express their observations.
Aesthetic Valuing: Students analyze, assess, and derive meaning from works of art, including their own, according to the elements of art, the principles of design, and aesthetic qualities. Derive Meaning: Describe how using the language of the visual arts helps to clarify personal responses to works of art; identify and describe how a person’s own cultural context influences individual responses to works of art; discuss how the subject and selection of media relate to the meaning or purpose of a work of art.
Grade 5: Analyze Art Elements and Principles of Design: use their knowledge of all the elements of art to describe similarities and differences in works of art and in the environment
